Tracing render damage below windows
Tracing render damage below windows
A mark below a window tells you where a problem is visible, not necessarily where it starts. Water can travel from a sill, frame junction or fitting before it reaches the stained area. Cracking may relate to the opening, earlier repairs or movement elsewhere. The useful first step is a clear record for an assessment, without assuming that the nearest patch is the whole repair.

On this page
Photograph the opening as a complete assembly
Take a view that includes the window, sill, surrounding wall and the area below. Add an angled photograph to show projections and the underside of the sill where it is safely visible from the ground. A close-up of a stain alone can conceal the relationship that explains it. Label the window by elevation and position so the assessor can connect the pictures easily.
Record when the mark appears and whether it changes after rain. Note any recent window replacement, drilling, decorating or gutter work nearby. These observations can help establish the sequence of events, but they should not be presented as proof of cause. A stain following a window installation may be related, or it may have become noticeable at the same time for another reason.
Do not lean from an upper window, climb onto a roof or disturb loose render to improve a photograph. If material could fall onto a route below, keep people away and seek appropriate assessment. The contractor or surveyor should choose safe access for close inspection. A useful ground-level record is better than taking a risk to obtain a detail that needs professional examination anyway.
| Observation | Useful record |
|---|---|
| Water pattern | Dated image after relevant weather |
| Opening history | Window, sill or lintel work dates |
| Surface condition | Cracks, loose areas and earlier patches |
| Proposed repair | Named junction and wall work included |
Separate staining, cracking and loss of bond
A dark streak may be surface contamination, repeated wetting or a sign that a water-shedding detail is not working. A crack may be confined to the finish or continue into the background. A hollow or loose patch indicates another condition again. Several can occur together, so the assessment needs to distinguish them rather than apply the same treatment to every visible mark.
The visible extent can underestimate the work. A small opening may lead to a larger detached area, while a broad stain may sit on otherwise sound render. Ask the assessor to explain how the proposed repair boundary has been chosen. A marked photograph or drawing is useful when the decision cannot be understood from a general description such as make good beneath window.
Where the cause remains uncertain, further investigation may be needed before decoration. A new coating can make the wall look uniform while removing evidence of how it behaves during wet weather. Keep the original photographs and observations. They may be useful to another specialist if the render assessment identifies a problem beyond the surface finish.
Look at the sill and its relationship to the wall
The sill should be considered with the frame and finished wall face. Its projection, ends and underside detail influence how water leaves it. If the render build-up has changed, the old relationship may no longer be suitable. The assessment should identify the actual junction and the intended repair rather than assume that adding sealant to the visible gap will solve every problem.
Previous repairs can also alter the shape beneath the sill. A thick patch may reduce a clearance or create a ledge that collects dirt and water. Ask whether the proposed render repair includes correcting such details. Matching the old appearance exactly is not useful if that appearance includes a poorly formed junction that contributes to the defect.
If a sill needs replacement or extension, coordinate that work before the final wall finish. Identify who supplies and installs it and how its ends are treated. The render contractor and window trade should use the same detail. A return visit to cut into freshly completed render can create a new patch and make the appearance harder to resolve.
Consider the history of the opening
A widened window, replacement lintel or blocked opening can introduce a change of masonry into the wall. The render may conceal those differences until a crack appears. Where records exist, provide them to the assessor. If the background needs to be exposed, photograph what is found before it is repaired and covered again.
A replacement frame can leave narrow strips of disturbed material around the perimeter. These areas need a compatible build-up and a considered edge, not merely a cosmetic smear. Ask how the existing render will be cut back to sound material and how the new work connects to it. The final joint should allow the window and wall system to perform as intended.
Movement concerns require an appropriate assessment. Reinforcement within a render repair does not remove the need to understand a recurring crack or a structural joint. If another professional is needed, the sequence should allow that advice to be obtained before finishing. It is better to resolve the question while the area is accessible than to cover it and rely on the new colour to distract from it.
Choose a repair and finish that fit the finding
Render repair can address a defined area once the background and cause have been considered. The material needs compatibility with the existing system, including any reinforcement or insulation layers. The repair should not be selected solely by a colour match. Ask what is being reinstated beneath the surface and how the edge of the patch is formed.
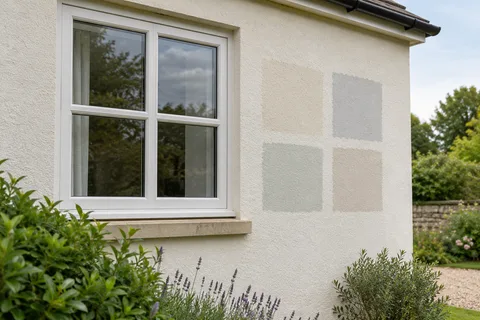
If the wall is otherwise sound but the patch will be visually conspicuous, a compatible render respray across the elevation may be considered after curing. That can reduce colour differences without necessarily hiding a different texture. View the expected result realistically and avoid promises of an invisible patch. A sample or an agreed treatment boundary can make the decision clearer.
Where defects extend across the face, wall rendering may be a more coherent option than a series of local patches. Compare the scope and disruption of each approach. A complete replacement should still address the sill or frame detail that contributed to the original problem. More new material is not a substitute for correcting the relevant junction.


Keep the repair record specific enough to use later
Label the photographs before, during and after the work. Record any sill, frame or rainwater changes alongside the render products and completion date. If a mark returns, this makes it possible to compare the same location rather than rely on a vague memory of how the wall looked. Keep the record with the wider property maintenance information.
Follow the instructions for curing and any later coating. A patch can change appearance as it dries, so agree when the finished result will be reviewed. At the same time, do not dismiss new water marks simply because work is recent. Report changes with dates and photographs so that the contractor can distinguish normal drying from a concern requiring another visit.
The Sutton-in-Ashfield rendering overview links to the related repair, coating and insulation options. If external wall insulation is planned, resolve the window detail as part of that design rather than repairing it to a wall position that will soon change. The most useful outcome is a clear account of the defect, the junction corrected and the layers reinstated, so future maintenance starts from evidence.
Common questions
Should a new sill be fitted before the repair?
Where the sill or its junction is part of the defect, agree the correction and its timing before closing the wall. Some details require coordinated work rather than a simple first-and-second sequence. The repair proposal should show the completed projection and drip, the end junctions and how the adjacent finish will meet them without blocking drainage.
See housing and planning information for Sutton-in-Ashfield and nearby places, including the source and geography behind each figure.