Render repairs in Sutton-in-Ashfield
Render repairs in Sutton-in-Ashfield
A repair should deal with a defined defect and explain why it happened. Cracking beside a replaced window, a hollow patch and staining below a pipe do not necessarily need the same treatment. Record what you can see safely, then use an assessment to establish whether a local repair is appropriate or the problem extends beyond the visible mark.

On this page
Describe the defect without trying to diagnose it
Take an overall photograph of the wall, then closer views that show the defect beside a recognisable feature. Include a ruler in a photograph only if the area can be reached safely from the ground. Record when you first noticed the problem and whether it changes after rain. Those observations help an assessor; they do not prove the cause or tell you whether a crack is structural.
If material is loose above a doorway, driveway or shared path, avoid standing beneath it and obtain appropriate advice promptly. Do not pull at the surface to see how much comes away. A small visible opening can conceal a larger detached area. The safe access and inspection method should be chosen by the person carrying out the assessment, particularly where upper walls or roof surfaces are involved.
Keep earlier repair information if you have it. A date, product label, photograph or invoice can reveal whether the same location has failed repeatedly. Repeated filling without understanding the reason can leave an increasingly complicated surface while the original issue remains. A useful survey distinguishes what has been observed from what still needs investigation and identifies any work that belongs with another specialist.
| Record | Example of useful detail |
|---|---|
| Location | Rear elevation, below left window |
| Timing | First noticed and any change after rain |
| Previous work | Known repairs or window replacement |
| Extent | Overall image and safe close-up |
- Map the damage Tapping finds hollow areas; cracks and their likely cause are noted.
- Cut back Failed render is cut out to a sound edge, usually squared off.
- Fix the cause Leaking gutters, sills without drips or render below the DPC are dealt with.
- Rebuild in coats Using a material compatible with the surrounding render and masonry.
- Blend the finish Texture is matched; colour may need a coating over the wider area.
The usual order of work. The survey and the chosen products decide the actual steps.
Set the repair boundary on sound material
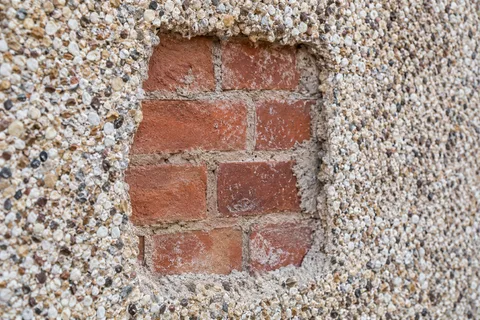
The damaged area visible from the garden is not always the correct edge of the repair. The contractor needs to establish a sound boundary and assess what happens beneath neighbouring patches. Explain whether the proposal allows for opening up a limited area and revising the extent once it can be inspected. That is different from an undefined promise to repair anything discovered.
Photograph the exposed background before it is covered. Changes in masonry, an old fixing, a leaking junction or a poorly prepared earlier patch may become apparent. Record the condition and the chosen response. If the repair cannot proceed until another defect is addressed, agree temporary protection and the sequence of visits. Avoid leaving a freshly opened wall while responsibilities remain unclear.
Where defects are spread across the elevation, compare the practicality of multiple patches with renewing the whole face. Wall rendering may be a clearer solution in some circumstances, but the extent should be justified by the condition and desired appearance. A full replacement is not automatically required because one patch looks untidy, and a collection of small repairs is not automatically economical if much of the covering is insecure.
Match the system as well as the visible surface
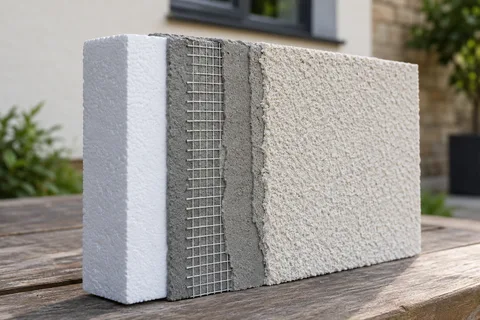
Identify the existing render family and the background where possible. A patch needs appropriate adhesion, thickness and compatibility, not merely a close colour. Repairs to a thin-coat reinforced system can involve different layers from a repair to a traditional mineral render. Ask which layers are being replaced and how the edges connect to material that remains.
Movement-related details need particular care. If a joint has been bridged or a crack follows a junction between different backgrounds, the repair may need a revised detail rather than another rigid patch. Reinforcement is not a cure for every movement problem. The assessor should explain whether the cause is sufficiently understood to proceed and what uncertainty remains.
Older lime work calls for a compatible approach to both the render and any masonry repairs beneath it. A hard patch may look neat at first while behaving differently from the surrounding material. Lime rendering guidance can help explain that distinction, but the final repair specification must relate to the wall being inspected. Avoid selecting a convenient bagged product simply because only a small quantity is needed.
Agree the appearance before work begins
An exact invisible match is difficult to promise. The existing surface has weathered, and even the original product can look different when newly applied. Texture, aggregate, finishing technique and light all affect the result. View any proposed sample beside the old surface and decide whether a discernible patch is acceptable. The answer may differ between a sheltered rear corner and the main front elevation.
Recolouring the whole wall can sometimes reduce colour differences after the repair has cured, but it does not necessarily hide a change in texture or level. Render respray requires its own assessment of coating compatibility and preparation. Do not assume that paint will make a raised patch disappear or that a decorative coating will stabilise loose neighbouring render.
Where the repair is close to a window, include the frame junction, sill and lower corners in the inspection. Replacement windows can leave several different materials around the opening. The edge needs a deliberate detail that allows the components to function as intended. A narrow band of filler smeared around the frame is not a substitute for understanding the damaged build-up.
Leave useful evidence for the next inspection
Keep a short record of the original defect, work carried out, products used and completion date. Include photographs at the opening-up and finished stages. If a stain returns or a crack develops nearby, this information helps establish whether it is the same issue. It also prevents a future contractor from assuming that every patch on the elevation was completed at the same time.
Follow the specified curing and decoration intervals. A repair that looks dry at the surface may not yet be ready for the next treatment. Ask when the appearance should be reviewed and what changes should be reported. Avoid judging a damp patch against a fully dried surrounding wall or applying an unapproved coating simply to make the colours look alike sooner.
Inspect accessible fittings as part of normal maintenance. A renewed patch below a faulty gutter can quickly be exposed to the same runoff as before. Keep water-handling defects and render defects on the same project record even when different trades address them. The aim is to avoid repeating the original circumstances, while recognising that no remote guide can guarantee how an individual repair will perform.
Common questions
Can a repair be guaranteed to disappear into the wall?
An exact visual match should not be assumed. Age, weathering, texture and previous coatings all affect the surrounding surface. Look at a cured trial repair and agree whether the aim is a compatible local repair or a more uniform appearance across a complete panel. Those are different scopes of work.
See housing and planning information for Sutton-in-Ashfield and nearby places, including the source and geography behind each figure.